How to Use Uniswap on Polygon | Step by Step Guide

The Uniswap protocol is a decentralized exchange (DEX) originally designed and built for exchanging ERC-20 Tokens on the Ethereum blockchain. It is seen as the flagship DeFi project. The protocol is implemented as a set of persistent, non-upgradable smart contracts. The protocol is now on its v3 iteration, and what is significant about this latest release is that Uniswap is now powered by the Polygon $MATIC blockchain. Gas fees on Ethereum have limited usage of the platform in recent times, and the deployment to Polygon is seen as a way of solving this problem. This guide is going to show you how you can take advantages of the cheaper gas fees by walking you through Uniswap on the Polygon network.
Getting started on Uniswap
Firstly go to https://app.uniswap.org. As with all DEX’s you will need to connect a wallet to get your journey started.
- Start by clicking on the ‘Connect’ button at the top of the page.
You will be able to choose from a number of wallets. For this example, I am going to use a MetaMask wallet.
- Approve access to the Uniswap application within your wallet. By default you will need to make sure your MetaMask wallet account is connected to the Ethereum blockchain.
- You have connected your wallet.
- Let’s get you on to the Polygon blockchain. Click on the ‘Ethereum’ drop down (next to your wallet address), and select the ‘Polygon’ network.
- Your wallet will notify you to switch the network to Polygon. Approve this within your wallet by clicking on the ‘Switch network’ button.
- You are ready to start using Uniswap on Polygon.
You will need some $MATIC tokens within your wallet for gas fees. Bear this in mind when connecting your wallet. You will also need to ensure that all tokens that you want to use for swapping are on the Polygon network. You can bridge tokens onto the Polygon network using the ‘Polygon token bridge’.
Let’s get started!
Swapping Tokens
Swapping tokens on Uniswap is super simple. You just have to select the tokens that you wish to swap, review the swap, and execute it.
- Pick your tokens that you want to swap and the amounts you wish to receive.
- Confirm swap.
- Click on the ‘confirm swap’ button and then confirm the transaction in your wallet.
- You will be able to see the status of your transaction in your wallet or in the Uniswap app by clicking your account.
- Confirmation.
- The transaction has now been submitted, and your tokens will be available in your wallet.
That’s all there is to it.
Providing Liquidity
In Uniswap v3, liquidity providers (LPs) are able to provide their tokens within custom price ranges, providing greater amounts of liquidity at desired prices.
Uniswap v2 previously required all users to provide liquidity across the entire price curve – between 0 to infinity, Uniswap v3 allows LPs to provide capital in a price range that they believe will generate the highest return.
The below steps will guide you through how to provide liquidity within the Uniswap app.
- Create a new liquidity position.
- Firstly, click on the ‘Pool’ link in the Uniswap navigation menu.
- Then you need to click on the ‘New Position’ button.
- Select the pair of tokens you want to provide as liquidity.
- Search and select the pair of the tokens that you wish to provide as liquidity. Then choose the fee tier that you wish to pay.
- Uniswap will, in the first instance, auto-select the fee tier with the most liquidity. In most cases, LPs will align around one fee tier for a pair. You can change this if you wish.
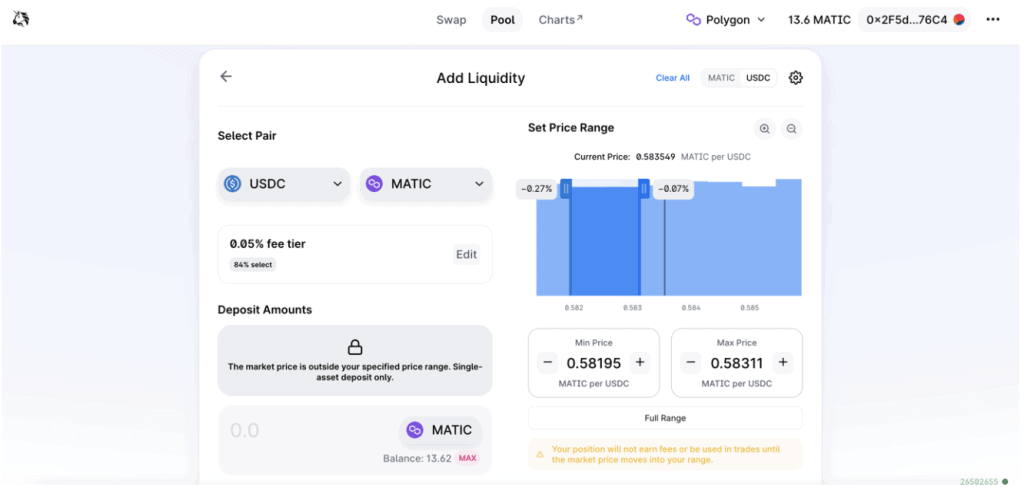
- Select the price range you wish to provide liquidity in.
- You now need to choose a price range in which to provide liquidity.
- If the price moves outside your specified range, then your position will be concentrated in one of the two assets and not earn trading fees until the price returns to their range.
- However, you can also provide liquidity across the Full Range (like in Uniswap v2) by clicking the ‘Full Range’ button. If you provide liquidity across the full price range, then your rate of return will be lower than a similar position with a narrower price range.
- Select the amount of each token that you wish to deposit.
- Once you have decided how much you wish to deposit, enter a value in one of the ‘Deposit Amounts’ boxes and the other box will automatically populate the corresponding amount.
- Add liquidity.
- Click on the ‘Preview’ button, and then on the ‘Add’ button to submit the transaction.
As with swapping, you may need to approve Uniswap moving the tokens from your wallet. This will only be necessary when you are providing liquidity with a token for the first time.
Once you have given permission for Uniswap to move your tokens, you can then approve the transaction in your wallet.
You will get confirmation that the transaction has been submitted.
- View your position in the Pool overview.
- Once the transaction has been confirmed, you are able to monitor and manage your position on the ‘Pool’ page.
Enjoy earning yield with Uniswap!









So much for being a defi “flagship”. It won’t even show you the APR. There’s no calculator for it within the dapp itself either. I would have to go to some sketchy website and risk my coins being drained out of my wallet for that APR calculator, and even then, that might not be accurate. No explanation on how to calculate it either. You’re just expected to blindly provide liquidity and hope for the best.